> For the complete documentation index, see [llms.txt](https://docs.arnica.io/arnica-documentation/llms.txt). Markdown versions of documentation pages are available by appending `.md` to page URLs; this page is available as [Markdown](https://docs.arnica.io/arnica-documentation/getting-started/chatops/microsoft-teams.md).
# Microsoft Teams
## Overview
Arnica's Microsoft Teams App creates a connection between Arnica, Microsoft Teams, and your integrated source code management systems, providing developers with a streamlined process for requesting access, receiving Arnica event alerts, and resolving findings in the chat tool they already use.
From a Teams message, a developer can review a hardcoded secret or code risk, acknowledge it, or dismiss it with a justification, without opening the Arnica application. Where policy requires it, the dismissal is routed to a reviewer for approval.
{% hint style="info" %}
This guide references `app.arnica.io`. If your Arnica tenant is hosted in the European Union, use `app.eu.arnica.io` instead wherever an Arnica URL appears.
{% endhint %}
## Integrating with Microsoft Teams
The Microsoft Teams integration is set up from within Microsoft Teams rather than from the Arnica [Integrations page](https://app.arnica.io/#/admin/integrations), and it has three parts:
1. A Microsoft 365 Global Administrator installs the Arnica App for the organization.
2. The same administrator authorizes Arnica for the organization.
3. An Arnica user connects the Microsoft tenant to the Arnica tenant from within Teams.
### Which Arnica Teams App to install
Arnica publishes a separate Microsoft Teams App for each region. Install the one that matches the Arnica environment that hosts your tenant:
| Arnica environment | Teams App to install |
| --------------------------- | -------------------- |
| `https://app.arnica.io/` | **Arnica** |
| `https://app.eu.arnica.io/` | **Arnica EU** |
Both apps are published by **Arnica, Inc.** and are not interchangeable: an organization whose Arnica tenant is hosted in the European Union must install **Arnica EU**.
### Step 1: Installing the Arnica App
1. Sign in to [admin.teams.microsoft.com](https://admin.teams.microsoft.com) as a Global Administrator and navigate to **Teams apps** → **Manage apps**.
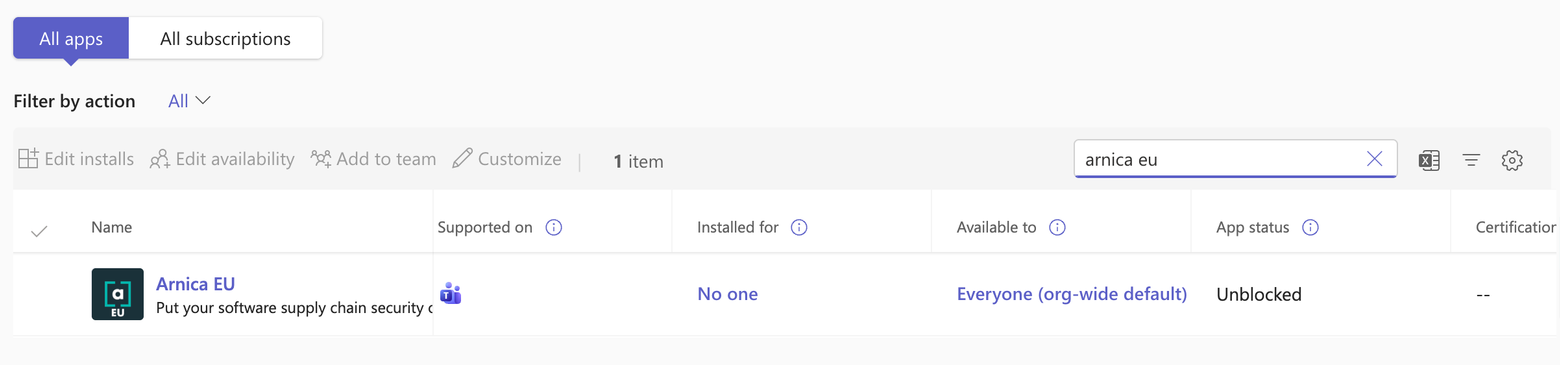
2. Search for the app for your region — **Arnica**, or **Arnica EU** for tenants hosted in the European Union — and select it.
3. Review the requested permissions and accept them to enable the app.
4. Set **User access** to *Allowed* so that users can access and install the app.
5. Navigate to **Teams apps** → **Setup policies**.
6. Create or edit a setup policy that adds Arnica to **Installed apps** for the users who need it. Assign the policy organization-wide, or to specific groups through group policy assignment.
7. Optionally, add Arnica to **Pinned apps** so the app appears in the Teams sidebar for quick access.
8. Save the policy. Arnica is then installed automatically for every user in scope.
{% hint style="info" %}
A setup policy is assigned to users, not to channels. Rather than assigning it organization-wide, scope it to the Microsoft 365 or Entra ID groups whose members need Arnica — typically the security, software engineering, and product management groups.
{% endhint %}
### Step 2: Authorizing Arnica for your organization
Installing the app makes Arnica available in Teams. A separate, one-time organization-wide authorization grants Arnica the Microsoft Graph access it needs to resolve users and channels as notification recipients.
1. Sign in to the [Microsoft Entra admin center](https://entra.microsoft.com) as a Global Administrator.
2. Navigate to **Entra ID** → **Enterprise apps** → **All applications** and open the Arnica application.
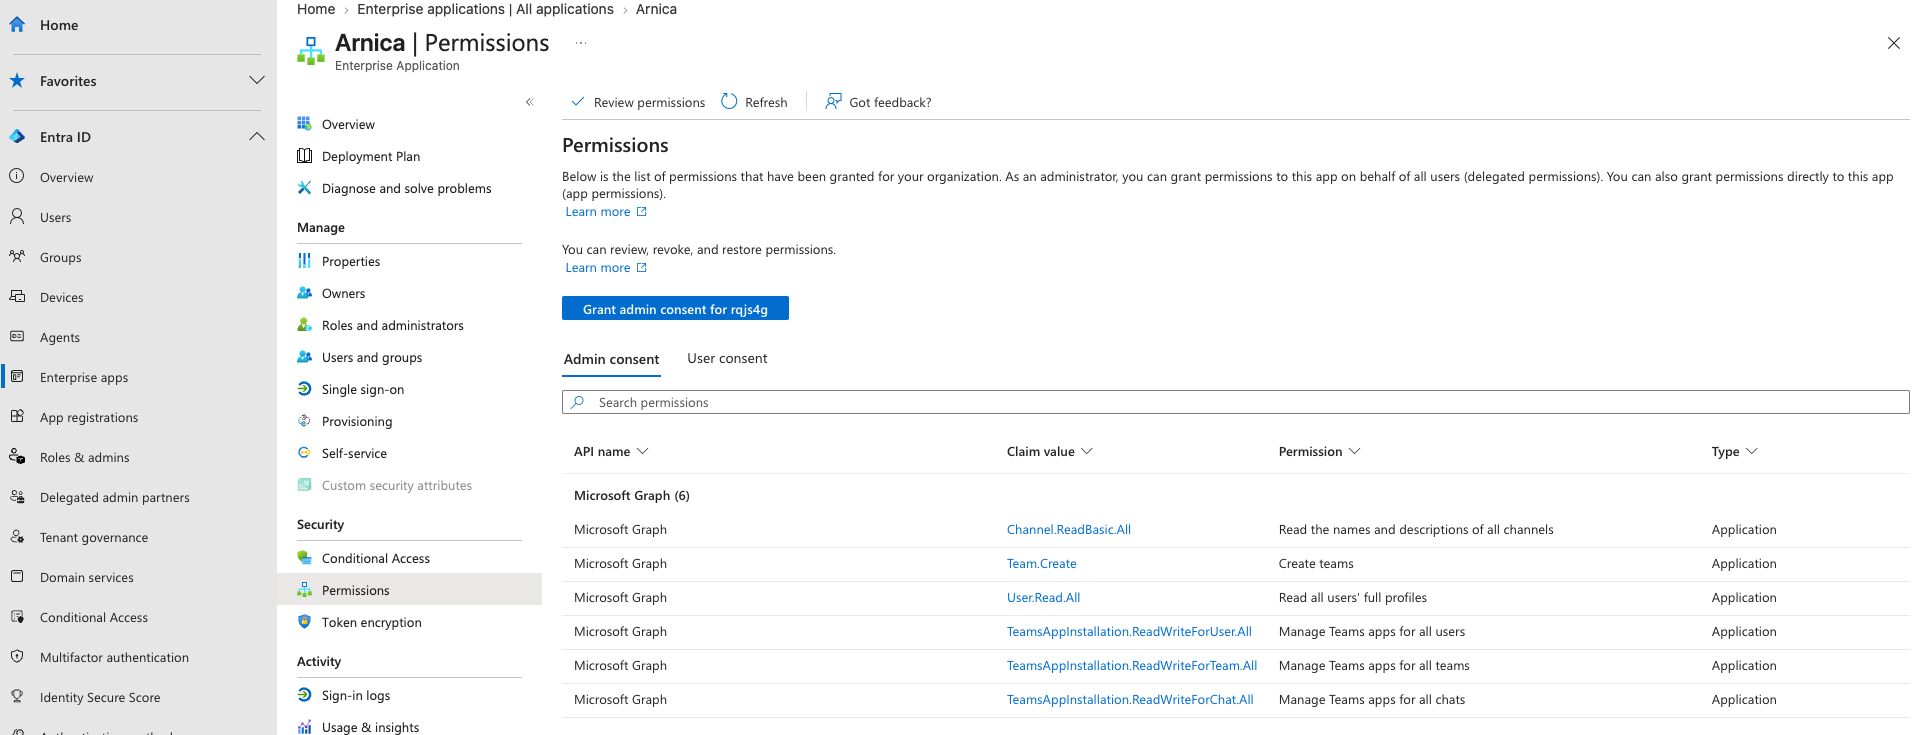
3. Select **Permissions** under **Security**.
4. Select **Grant admin consent for \**.
5. Review the Microsoft Graph permissions Arnica requests and accept them. The granted permissions are then listed on the **Admin consent** tab.
{% hint style="info" %}
If Arnica is not listed under **Enterprise applications**, the app has not been installed in the tenant yet. Complete [Installing the Arnica App](#step-1-installing-the-arnica-app) first, then return to this step.
{% endhint %}
{% hint style="warning" %}
If this step is skipped, the Arnica app installs and responds in Teams, but Arnica cannot resolve users and channels through Microsoft Graph. The most common symptom is a user who has the app installed but does not appear in the notification recipient list.
{% endhint %}
### Step 3: Connecting your Arnica tenant
1. Open the Arnica app in Teams. Type `help`. Arnica replies with a welcome message containing a **Connect with Arnica** button.
2. Select **Connect with Arnica**. Arnica opens in the browser.
3. Sign in to your Arnica tenant, or sign up if you do not have an account yet. Arnica creates the Microsoft Teams communication integration for your Microsoft tenant.
4. Once the Microsoft tenant is connected, every other user in the organization sees the same welcome message when typing `help` without the **Connect with Arnica** button.
{% hint style="info" %}
The connection link is single-use and expires after one day. If it expires before you finish, send `help` to the bot to generate a new one.
{% endhint %}
The integration then appears on the [Integrations page](https://app.arnica.io/#/admin/integrations) as **Microsoft Teams**. It can be removed but not edited.
{% hint style="warning" %}
Removing the integration deletes the integration record and all saved Teams contacts for that Microsoft tenant, interrupting Teams notifications. Reconnect the tenant and verify notification recipients and delivery before relying on alerts again.
{% endhint %}
### Step 4: Configuring and verifying notifications
Connecting the integration does not enable alerts on its own. Arnica sends a notification only when an event matches a policy rule with a notification action.
1. Configure a [secrets detection policy](/arnica-documentation/hardcoded-secrets/secrets-policy-settings.md) or [code risk policy](/arnica-documentation/code-risks/code-risk-policy-settings.md) with a notification action and the intended Teams recipients.
2. For a direct message, ask the recipient to send `help` to the bot first. For a shared destination, follow [Adding Arnica to a Team or Channel](/arnica-documentation/getting-started/chatops/microsoft-teams/adding-arnica-to-a-team-or-channel.md).
3. Confirm that the intended user, team, or channel appears in the rule's recipient list, then save the rule.
4. When the next matching event occurs, confirm that the notification arrives at the selected destination. If it does not, follow [Alerts are not arriving after the integration is connected](/arnica-documentation/getting-started/chatops/microsoft-teams/operational-guidance.md#alerts-are-not-arriving-after-the-integration-is-connected).
## Next steps